How to check resistance (continuity) in a component-
A Digital Multi-meter (Ohmmeter) is needed for testing components:
 An ohmmeter can be used to directly measure an unknown resistance R.
This is the simplest way to measure resistance. It is important to realize
that an ohmmeter can not be used when the resistance is connected in a circuit and a current is flowing through it!
Typical Digital Multimeter

| Scale | Measurement Range | |
|---|---|---|
| in words | ohms (Ω) | |
| 2M | two megohm two million ohms |
0-2,000,000 |
| 200K | two hundred kilohm two hundred thousand ohms |
0-200,000 |
| 20K | twenty kilohm twenty thousand ohms |
0-20,000 |
| 2K | two kilohm two thousand ohms |
0-2,000 |
| 200 | two hundred ohm | 0-200 |
Setting up the meter
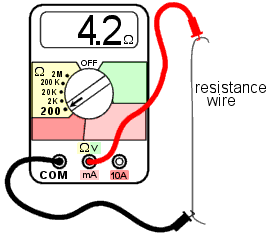
To use the multi-meter as an ohmmeter turn the selector dial to point to the ohms range. On some models (usually not on the cheaper ones) the meter will have a single ohms setting and will auto select the best range for you.
To measure resistance you must connect the test leads to the sockets labeled ‘COM’ and ‘Ω‘. These may be in different positions on your meter but the labeling should be the same.
Without anything connected between the test leads the display will give an out of range indication (-1 in this case) to show that the resistance is too large to measure. In effect, you are trying to measure the resistance of the air between the two inputs, which is very large.
Taking measurements
To check the meter is working touch the leads together and the display should read 0.0 Ω. It may read slightly higher, e.g. 0.3 Ω. This is the resistance of the test leads themselves.
 Turn the selector dial to the lowest resistance range that gives a valid reading.
In this case the resistance wire has a resistance of 4.2 Ω.
Accuracy
The overall accuracy of the reading will depend upon the multi-meter model. The more expensive the meter the better the accuracy will be. For a cheap meter the accuracy is typically in the region of +/- 1% of the displayed value. Check in the manual for the accuracy of your model.
It is important to select the correct measurement range. In the above example if the 2 kΩ range is selected the display will read .004 kΩ and the decimal place will be lost. If the dial is set to 20 kΩ the display may read 0.00 kΩ! Always turn the dial down to the lowest range to get the best accuracy.
OHM’s Law- How to calculate resistance and voltage using meter readings:

